NIH Other Support - Flattening PDF's
While NIH requires that Investigators eletronically sign their Other Support, NIH's systems (eRA Commons/ASSIST) will only accept a flattened PDF as an attachment. And for JIT's and RPPR's which usually involve a single attachment for multiple Investigators: only a single, flattened PDF that combines all signed Other Supports is required.
The process of signing the Other Support electronically creates a certification "layer" that first must be flattened before it can be uploaded to eRA Commons/ASSIST and/or before it is combined with other PDF's before submission to NIH. Since each electronically signed Other Support needs to be flattened first before compiling as a single PDF document, this is a crucial step.
However, the original, unflattened Other Support documents must be retained and kept internally in the event that it is requested by NIH. Stanford University and the Investigator must retain sufficient supporrting documentation to reasonably authenticate that the appropriate individual signed the form. (NIH FAQ's).
(For NIH Other Support signed using the Stanford guidance) How do I know if my document has been flattened?
The unflattened, signed/certified Other Support will have a "blue bar that says Signature Panel on the right-hand side" that states that there are signatures (if signed via Adobe Pro/Adobe Acrobat Reader) or that the document has been certifiedby Adobe Sign (see screenshots below). Once the document has been flattened, this bar will disappear, but the signature or digital ID should remain.

Screenshot of Signature Panel
For Microsoft PC Users:
You can create a flattened PDF with virtually any other software that allows you to view PDF documents.
- Open your existing PDF document in your PDF reader of choice (Adobe Pro, Adobe Acrobat Reader, web browser, etc.)
- Click File > Print or just the Print button.
- As your printer: Choose 'Microsoft Print to PDF' as your printer.
- An alternative choice for flattening documents is selecting "Adobe PDF" printer rather than Microsoft Print to PDF; however, this may not work if your document was signed through Adobe Sign; in that case, please use Microsoft Print to PDF.
- An alternative choice for flattening documents is selecting "Adobe PDF" printer rather than Microsoft Print to PDF; however, this may not work if your document was signed through Adobe Sign; in that case, please use Microsoft Print to PDF.
- Click Print.
- Input a File name for the to-be created flattened PDF.
- Click Save. This newly saved document should be a flattened PDF.

For Mac OS Users:
Option 1 (should work for most):
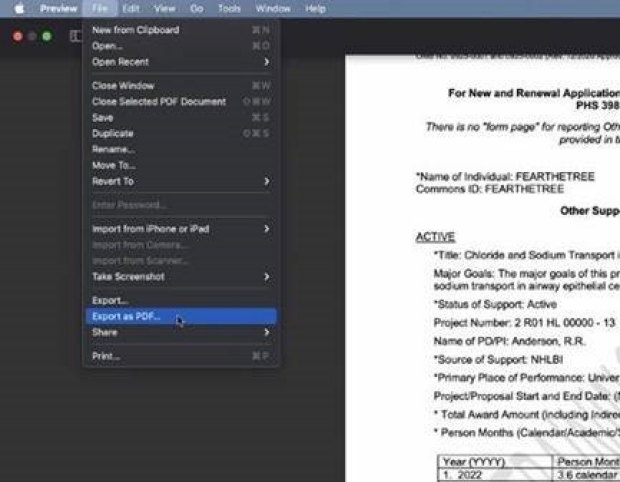
You can use the built-in/pre-installed Mac OS application called, "Preview" to flatten the PDF. Make sure the document you want to flatten are stored locally in your computer.
- Launch the Preview application on your Mac computer. (You should be able to find this using Finder).
- Using the Preview application, open the PDF.
- At the top of the screen of the Preview application menu, click "File" > "Export as PDF." (Do NOT select "Export").
- Input a File name for the to-be created flattened PDF.
- Click Save. This newly saved document should be a flattened PDF.
Option 2 (might not work from everyone and requires Adobe software):
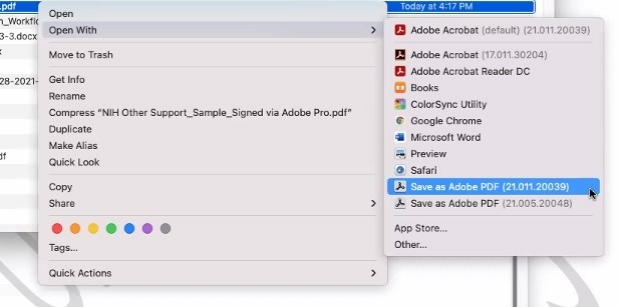
Make sure the document(s) you want to flatten are stored locally in your computer.
- Using a Finder window, locate the unflattened PDF in your hard drive.
- Once located, right click on the PDF file. For Mac's, this is done by holding the control key and left-clicking/clicking on the file.
- Select "Open With" > and select "Save as Adobe PDF." (This may not appear for everyone).
- Input a File name for the to-be created flattened PDF.
- Click Save. This newly saved document should be a flattened PDF.
Combining Flattened PDF's
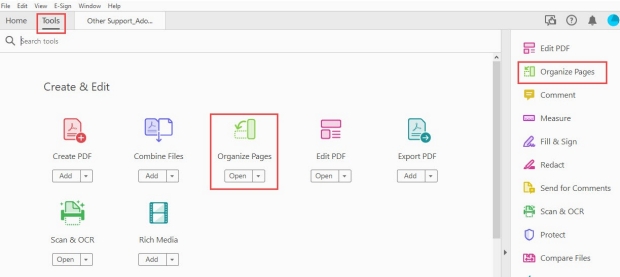
To combine flattened PDF's (e.g., when you have to compile multiple flattened Other Supports), you must have an Adobe PDF reader. The steps below should work for both the paid Adobe Pro software or the free Adobe Acrobat Reader DC software. If you are having issues combining PDF's, you may not have flattened PDF's or there may be a software issue.
- Using your Adobe PDF reader of choice, open the flattened Other Support PDF that will come first.
- Use the "Organize Pages" Tool (see screenshots below).
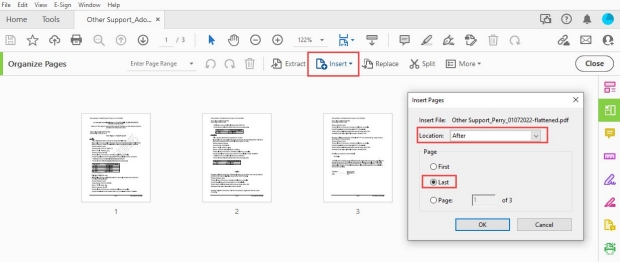
- On the "Organize Pages" toolbar, select "Insert" and select the next PDF that you want to insert into this document. (Make sure the PDF you are inserting is a flattened PDF).
- A window will open asking where you want to insert the PDF pages. Select Location: "After" and Select Page: "Last". (see screenshots below).
- This will insert the PDF at the end of the first Other Support PDF.
- This will insert the PDF at the end of the first Other Support PDF.
- Repeat step 3-4 for each subsequent Other Support PDF making sure you keep adding them after the last page of the previous PDF.
- Once you have the complete, compiled Other Support PDF, click Save As and name the file appropriately.
- This should be a flattened PDF ready for submission.
For Mac Users, the following Apple Support page might help as an alternative method: https://support.apple.com/en-us/HT202945
There are numerous ways to combine PDF's, if the steps above don't work you may need to look online for a way that works.
Page last updated February 9, 2022.
Need further assistance? Have questions and/or feedback? Please submit questions and/or feedback by clicking HERE, and a member of the ORA-RMG Disclosures Team will respond to you shortly.